I finally got around to doing it and I'm delighted with the outcome. Kodi and the Raspberry Pi together make a cheap yet useful media center solution.
The hardware & software
Kodi is an open source media center application with a polished interface that will rival any commercial product. Combine it with the tiny form factor of the Raspberry Pi, and the end result is an unobtrusive device that packs a powerful entertainment punch.
Operating System
Quite a few OS options are available for the Pi, I settled on Arch Linux. It is lightweight and highly customizable. Packages are always up to date thanks to rolling releases and the wiki provides excellent documentation.
Shopping list
- 1 x Raspberry Pi 3 Model B has plenty of grunt to run Kodi hassle free. Networking is provided by the built in WIFI.
- 1 x Extreme MicroSD with high read / write speed for optimal performance. A small size (8GB) will work well since it only needs to contain a lightweight OS and the Kodi application. Digital content can be served off an external file server (NAS) or streamed over the internet.
- 1 x Micro SD Card Reader / Writer, used to write to base operating system image.
- Optionally a case for the Raspberry Pi.
Arch Installation
The instructions for installing Arch linux on a Raspberry Pi relies on linux command line tools. OSX users can get around this limitation by using Vagrant, VirtualBox and the VirtualBox Extension Pack.
Kodi-dev is a Vagrant project that will create an Arch linux Virtual Machine (VM) with all the required tools installed. Additionally it contains an installation of Kodi that can be used for add-on development, but more on that in a later post.
$  git clone https://github.com/monkey-codes/kodi-dev
$  cd kodi-dev
$  vagrant plugin install vagrant-reload
$  vagrant up
Note that Vagrant 1.8.7 for OSX has a bug with the packaged curl binary. The suggested workaround, if vagrant up does not download the box file, is to symlink the system curl: sudo ln -nsf /usr/bin/curl /opt/vagrant/embedded/bin/curl.
Once vagrant up completes, you should be presented with a fresh installation of Kodi.
The VM needs access to the Host machine's USB bus to install Arch linux on the SD Card. Insert the SD Card into the Writer and plug it into a USB port. To confirm it has access, SSH into the Virtual Machine:
$ vagrant ssh
$ lsusb
Bus 001 Device 003: ID 14cd:6700 Super Top Card Reader
Bus 001 Device 001: ID 1d6b:0002 Linux Foundation 2.0 root hub
Bus 002 Device 001: ID 1d6b:0001 Linux Foundation 1.1 root hub
Identify the SD Card Writer from the output of lsusb. Not seeing it? Make sure that its properly plugged into the USB port and that the SD Card is inserted.
The next step is to determine the device that Arch will be installed on.
$ lsblk
NAME   MAJ:MIN RM  SIZE RO TYPE MOUNTPOINT
sda      8:0    0   64G  0 disk
├─sda1   8:1    0  200M  0 part /boot
└─sda2   8:2    0 63.8G  0 part /
sdb      8:16   1 14.9G  0 disk
├─sdb1   8:17   1  100M  0 part
└─sdb2   8:18   1 14.8G  0 part
Output will vary depending on whether the SD Card has partitions. Identify the device by matching it with the size of the SD Card, sdb in this example. Still unsure?, unplug the Card Writer and see which device disappears when you rerun lsblk.
Identifying the right device is critical as you could destroy the VM by targeting the wrong one.— code monkey
Now follow the installation instructions provided by Arch linux, that has been duplicated and condensed below.
First setup the partitions:
$ sudo fdisk /dev/sdb
...
Command (m for help): o
...
Command (m for help): p
Disk /dev/sdb: 14.9 GiB, 15931539456 bytes, 31116288 sectors
...
Command (m for help): n
Partition type
   p   primary (0 primary, 0 extended, 4 free)
   e   extended (container for logical partitions)
Select (default p): p
Partition number (1-4, default 1):
First sector (2048-31116287, default 2048):
Last sector, +sectors or +size{K,M,G,T,P} (2048-31116287, default 31116287): +100M
...

Command (m for help): t
Selected partition 1
Partition type (type L to list all types): c
Changed type of partition 'Linux' to 'W95 FAT32 (LBA)'.

Command (m for help): n
...
Select (default p): p
Partition number (2-4, default 2):
First sector (206848-31116287, default 206848):
Last sector, +sectors or +size{K,M,G,T,P} (206848-31116287, default 31116287):

Created a new partition 2 of type 'Linux' and of size 14.8 GiB.

Command (m for help): w
The partition table has been altered.
...
After the partition table is created proceed to creating file systems and installing Arch on the SD Card:
$ sudo mkfs.vfat /dev/sdb1
$ mkdir boot
$ sudo mount /dev/sdb1 boot
$ sudo mkfs.ext4 /dev/sdb2
$ mkdir root
$ sudo mount /dev/sdb2 root
$ wget http://archlinuxarm.org/os/ArchLinuxARM-rpi-2-latest.tar.gz
$ sudo bsdtar -xpf ArchLinuxARM-rpi-2-latest.tar.gz -C root
$ sync
$ sudo mv root/boot/* boot
$ sync
$ sudo umount boot root
At this point the Pi can boot off the SD Card. Connect it to a monitor or TV and power it up, you should see a linux terminal login screen (Username & password is alarm).
The remaining installation instructions need to be executed on the Pi, either via a direct terminal or SSH.
Networking
The wifi-menu tool can be used to get the Pi connected.
$ su root
Password: root
$ wifi-menu -o
After completing the wifi-menu setup wizard the wlan0 interface should be up.
$ ifconfig wlan0
...
wlan0: flags=4163<UP,BROADCAST,RUNNING,MULTICAST>  mtu 1500
        inet 192.168.1.7  netmask 255.255.255.0  broadcast 192.168.1.255
...
Finally ensure that Arch will connect to the Wi-Fi network at boot time.
$ netctl enable wlan0-YourWifiName
$ reboot
Installing Kodi
The next step is to install Kodi and configure it to start on boot. Additionally bumping the gpu_mem to 128MB also produces a smoother UI experience.
$ su root
Password: root
# this will do a system upgrade
$ pacman -Syu
$ reboot
# login again after reboot
$ pacman -S kodi-rbp
# select the mesa-libgl option (default)
$ systemctl enable kodi
$ tee /etc/X11/Xwrapper.conf <<EOF
allowed_users=anybody
needs_root_rights=yes
EOF
$ sed -i 's/gpu_mem=64/gpu_mem=128/' /boot/config.txt
$ usermod -a -G tty,input kodi
# Kodi should automatically start after the reboot
$ reboot
Optional OpenVPN Configuration
This section will cover how to install OpenVPN as a systemd service and control it through a Kodi addon.
Install OpenVPN on Arch:
$ pacman -S openvpn wget zip sudo vim
To make use of OpenVPN you need to purchase a subscription from an OpenVPN provider. Providers will have a set of OpenVPN configuration files, one for each exit node they provide. Download the configuration files into /etc/openvpn.
Usually the provider will require a username and password to connect to their service. To automatically provide these credentials, it needs to be stored in a file and linked in every *.ovpn config file.
$ su root

$ cd /etc/openvpn
$ tee /etc/openvpn/pass.txt <<EOF
your_user_name
your_password
EOF

$ for i in *.ovpn; do echo "auth-user-pass pass.txt" >> '$i'; done;
Symlink one of the exit node configurations to /etc/openvpn/client.conf, this is the configuration systemd will use.
$ ln -sf /etc/openvpn/Switzerland.ovpn /etc/openvpn/client.conf
$ systemctl enable openvpn@client.service
$ systemctl start openvpn@client
At this point all network traffic will go through the configured VPN connection. To change the exit node of the VPN connection manually, symlink the desired configuration file to /etc/openvpn/client.conf and restart the systemd service. (systemctl restart openvpn@client).
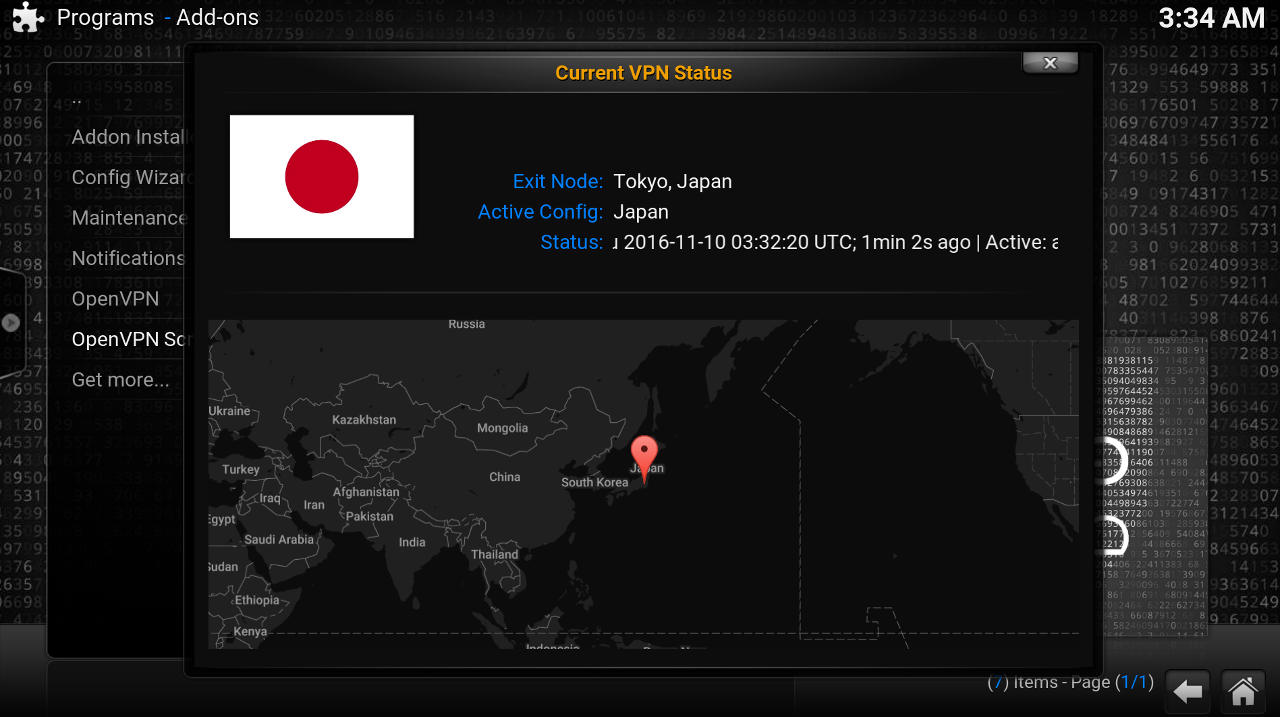
Manage VPN through KODI
The OpenVPN addon allows Kodi to control the VPN connection, however it requires certain sudo privileges.
Apply the following changes to the sudoers file.
$ sudo su -
$ visudo

...
##
## Cmnd alias specification
##
Cmnd_Alias SWITCH_VPN = /usr/bin/ln -sf /etc/openvpn/* /etc/openvpn/client.conf, /usr/bin/systemctl * openvpn@client

...
##
## User privilege specification
##
# Add this as the last entry in the section
kodi ALL=(ALL) NOPASSWD: SWITCH_VPN
The addon is part of the kodi-monkey-repo repository. Download the repo zip file and place it in the Kodi home folder.
$ sudo su - kodi -s /bin/bash
$ cd ~
$ wget http://raw.githubusercontent.com/monkey-codes/kodi-monkey-repo/master/dist/repo.monkey.zip
Then follow the official Kodi instructions to install a repo from a zip file.